
The UK construction industry is vast and diverse, contributing £370 billion to the economy. Ensuring the continuous operation of assets, offices, and homes is a priority, and the supply chain is ever evolving towards a fully circular economy. Unfortunately, since 2010, construction industry accidents have claimed the most lives among all UK industries. Furthermore, deaths from construction-related illnesses, such as chronic obstructive pulmonary disease and lung cancer, have continued to rise over the same time period. The need for the construction industry to conduct work safely and efficiently has never been as paramount. It is estimated that around 300,000 properties in Britain, built before 1966, contain some level of ARTC. There is a wide range of installation methods, and the materials have changed significantly over the years, with the more modern components typically found in US-made products which are of polyisocyanurate rather than the polyurethane and urethane products typically found in older properties.
However, safe and effective removal of ARTC for re-development, renovation, or internal refurbishment is possible, particularly if the correct procedures are implemented. This paper covers a particularly difficult removal project that involved insulation stripping back from the entrance lobby area of a former store in Kent, and documents the challenges faced, including weather, scaffold access, necessity for a great deal of horizontal abseiling work, and client and public foot traffic. It presents a case study of a project classified as "hardest spray foam removal job in the UK", and provides recommendations for both health and safety and project delivery to help the construction industry deal more effectively with the removal of this insulation.
Understanding Spray Foam Insulation
Having been used in the USA since the early 1980s, spray foam has rapidly gained popularity across the UK and beyond. These materials boast very high insulation performance, and this has led to their rapid uptake in buildings carrying low energy labels. Spray foam can also be used in particular applications where we cannot easily achieve insulation with other methods, such as with insulation of curved surfaces. The ease of use of spray foam means that labor costs for its application are lower, and thermal bridging effects are minimized.
With their relatively low setting point, polyurethane foams can be used for filling gaps between cladding materials, and provide thermal performance as well as acoustic and air barrier benefits in these applications. They are customized depending on the function performed, carrying fire ratings as essential in roofs above habitation, also providing acoustic insulation in noisy environments; or else being free of volatile organic compounds when used within buildings to avoid problems with their occupants.
There are two types of foam available: open cell spray foam ideal for inside the building and closed cell spray foam recommended for the external side. Applications of closed cell foam include roofs, flat roofs within buildings, wet rooms and external wall cladding and/or flexibility of some kitchens as light waterproofing barrier. Open cell foam is normally used for internal walls and ceilings to perform as acoustic barrier, but is also applied on the external side in cold roofs to avoid the bathing condensation issue, since its permeability to water vapor provides the wall with an outlet for moist coming from the inside of the room.
Types of Spray Foam
All spray foam systems work the same way. They are the same in application. You mix Component 1 and Component 2 together, and spray it into a surface or area. All spray foam systems need air to coalesce and foam.
There are three basic material types in spray foam insulation. Open cell, closed cell, and half cell spray foams are all structural, providing excellent air sealing properties. They can also regulate moisture, while still providing a sound barrier. Open cell and closed cell spray foams are injections, eliminating any heat loss or cooling loss through the cavity, meaning they are also cost efficient solutions.
Open cell spray foams are softer structures that provide excellent sound deadening properties in a residential wall. Closed cell spray foams are very rigid structures that can provide energy-saving insulation R-value properties, but are also meant for structural boosts. What lies in between the two are half cell spray foams. They are hardening while still being compressible. There are many types of half cell spray foam insulation systems on the market. Some are better than others and some are meant for particular uses. Look for one meant for all building types.
Applications of Spray Foam
Spray foam insulation is used primarily in two applications - airtightness control and thermal insulation. But it has other uses like protection against vermin damage, sound reduction, preserving the thermal integrity of building interfaces with other structures, joining materials with disparate elastic properties, conservation of water vapour and safeguarding against rainfall on buildings at risk. This is in principle true, except when systems are badly designed, installed, or maintained.
Airtightness Control
Happily, the first function, achieved by use of polyurethane or polyisocyanurate closed cell spray foam, is the one in which that material excels. Airtightness of building envelope structures is essential. It checks the transmittance of water vapour saturated air and thus the water vapour reduction and heat flow of interior vapour pressure to exterior. By controlling internal vapour pressure, the risk of detrimental moisture settlement in the envelope is removed. Once dew point is established in the wall, the risk of detrimental frost action is also removed. Likewise, control of internal heat flow prevents detrimental summertime overheating. In the interest of air quality, the envelope has to be airtight so that air, possibly laden with dangerous pollutants is not sucked into the envelope to the outside.
Benefits of Spray Foam Insulation
In recent years, usage of spray foam insulation in buildings has rapidly increased and become a substantial market. Spray foam insulation was originally patented in 1937 by a man named Otto Bayer, where it was primarily used as a sealer for refrigeration units. In more recent years, though, its usage has increased and has been widely utilized in buildings and houses. Spray foam insulation contains several benefits such as being an air barrier, moisture barrier, sound barrier, energy savings, and a pest deterrent. A huge trend in the modern era is to conserve energy, and spray foam insulation aids in doing that. About 40% of the energy used in homes goes to heating and cooling. Here is a breakdown of how spray foam insulation can help:
Air Barrier: With the injection of spray foam insulation, it will expand and fill all the cracks and gaps in your building, which will block any air movement and exchange that may be happening. This helps your building become more of an energy-efficient building that helps meet the current energy codes.
Addresses Moisture Issues: Spray foam insulation can also address any moisture issues. In areas that are susceptible to moisture and mold breakdown, spray foam insulation can help resolve the existing issues that may be happening. It has a very low permeance that can help tackle high humidity areas, especially in bathrooms or near plumbing. This will mitigate any condensation issues that may be occurring within your building.
Challenges of Spray Foam Removal
Spray foam is nothing short of a miracle in the world of insulation. It provides insulation with the highest R-value per inch and the best air tightness performance. Unfortunately, not every building should be coated in spray foam. Sometimes, a building requires maintenance or is subjected to an environmental condition that was not foreseen when the spray foam insulation was installed. In these cases, it may be necessary to remove sections or all of the sprayed insulation. While this task is not commonly required, it can be very tasking for the contractors asked to perform the job. Here, we will explain some of the challenges associated with this process. Like with any renovation or demolition, older buildings were built using techniques and materials that are no longer available or that we would not consider safe today. Removing spray foam inevitably comes with the risk of damaging the underlying substrate. Sometimes, this substrate will contain asbestos, lead, or any number of other dangerous materials. In these situations, it will be up to the contractors to decide how to safely mitigate the risk to the occupants or to the building either by safely encapsulating the building materials during the removal, or by removing these materials themselves. This is not an easy choice to make and can create a lot of stressful moments throughout the removal process. It is essential that the removal contractors are informed of any potentially hazardous materials, as the process of removing toxic materials is heavily regulated. It is also very expensive—one of the main reasons owners consider spray foam insulation in the first place.
Common Issues Faced
There’s no question that spray foam insulation is very effective at keeping you warm. However, sometimes a building needs to be both warm and ventilated, especially in the case of thatched buildings. Thatch roofing is a natural insulator that keeps heat in, but allows long grass to evaporate rainwater, preventing a roof from rotting. Over the years, if thatching is not replaced, water may drip into the ceiling plaster and render it weak. If there is occasional rainwater erosion from the top, there’s potential for the plaster ceiling to collapse altogether. Removals, in this case, is particularly challenging because carpentry repairs must be done first. Removal is supposedly a one process job, but it has turned into a complex three stage system. In addition, the growth of mold in and around the employees work area along with limited access and logistics due to building design and layout play a significant role in making removals a challenging task. In the case of inverted roofs, a full scaffold usually has to be erected, increasing the time spent on the job. The fans that exhaust the fumes from the spray foam are usually very noisy. This means that other businesses nearby complain about the noise. Both the fumes, while they are not particularly dangerous, and the noise aspect require that foam vac removal is undertaken during non-working hours, which does reduce the usually tight margins.
Tools Required for Removal
During the decades that spray foam installation has been established, no tools were created specifically to deal with the removal of the foam. Instead, tool manufacturers had concentrated on providing tools for construction. Upon exploration of what had been successfully used and then trial and error, we began to compile a toolset that would allow us to remove spray foam from internal properties and silent some of the whining of some clients when being charged and not much for labor costs. Here are the tools we found: Dustless Sanders and Vacuums — as an alternative, the Vega and other single-phase dustless sanders worked extensively as part of the process. Ear Protection was a must to use with the tools being used — so as not to damage hearing. A good set of ear defenders, preferably with radios built-in, helped to reduce the noise. Extraction System — Work machines do not come cheap; if you are looking for an industrial work vacuum with a built-in HEPA filter, it is best to aim for a machine built in Germany. Flat Trowel Scraper Tool — Trying to remove it in uneven amounts sometimes resulted in scraping the product with lower parts touching the substrate, so I preferred to use a flat trowel-style scraper with a serrated edge. Coders — After trying various brands, we found that some were pretty solid options when scrapping out shards of foam to remove. OSS Plus Contour — There are so many applications, whether you are working on an angle or flat surface, that you can change over to suit your requirements. Making a connection point between our power sanders/extractors and the polisher allowed us the possibility to attach the Oscillating Multi Tool to a vacuum with a proper dust filter.
Safety Precautions
The spray foam removal is a hazardous job to accomplish, and you must ensure that it is being performed under extreme safety conditions. Accidents during the removal task can cause further damage to the house structure as well as serious injuries including concussions, fractures, or cuts. You, therefore, firstly need to ensure the house is empty and no children or pets can be around during the removal process. The rooms should furthermore be properly ventilated so that no airborne chemical causes irritation.
Limiting access to the house is especially important during the actual removal step using a cutter. Its special circular blade tool produces always floating dust particles. Additionally, respirator masks with high dust filtering protection must be worn by the workers to avoid inhalation of the dust from the cutter or other tools being used. Not just are these respirator masks absolutely necessary for the workers using the cutter and other equipment but also be sure to get a quality mask with proper fit for each worker, as a poorly fitting or inappropriate choice of masks leads to air leakage and lowers the mask performance. The dust floating in the air can lead to serious injuries to the lungs from inhalation of the polymer particles. Not just are masks necessary, but also protective goggles must be used in order to protect the eyes from exposure to the dust or other chemical contaminants.
You should also ensure to use other safety equipment needed by any worker on-site. Safety gloves protect against cuts when using saws and also against exposure to chemicals in dust or debris when using the cutter, angle grinders, chisels, or jackhammers. Ear protection, such as earmuffs or earplugs, is essential during any noisy spraying process. You should also take care to wear protective textiles such as overall, boots, or jackets that avoid any body or face injuries.
Case Study Overview
During my time as a spray foam insulation contractor, I spent almost three years working on a single commercial project. The building was a former 14,000 m2 department store in the West Midlands. This structure was then subject to a rapid and poorly managed series of alterations into a multi-use space set for retail, warehouse, and warehouse floor function. Each new tenant made further alterations to suit their own use and as a consequence a mismatched collection of new ceilings, walls, floors and more were left in a disjointed and staggeringly poor state of repair… there was barely an internal area of the building that wasn’t left in some form of half-finished, unsafe, substandard, non-compliant neglect. Many other contractors were involved and every method attempted to mesh it all together had their own pros and cons, but through it all vast ancient dust and burning cold had infiltrated throughout.
To fix and improve upon every other contractor’s work or to make good where none had been done, we were contacted for insulation. A third-party company had been involved for airtightness and apparently vapour control had been achieved in a very few places with varying degrees of success. The old building leaf walls around the retail area were mostly blowing cold and damp. The lift shafts leading to ten derelict floors above were left gaping on the wide retail area risking cold drop, radon gas and who knew what security issues… the light, poorly supported suspended ceiling broke fridges, lighting, air conditioning, and fire systems. Tenants moving in, taking the space, would require all of this and some very serious internal building services to make this a fit and functioning building. Their requirements were an airtight, warm, dry and fire-safe envelope… and fast.
Project Background
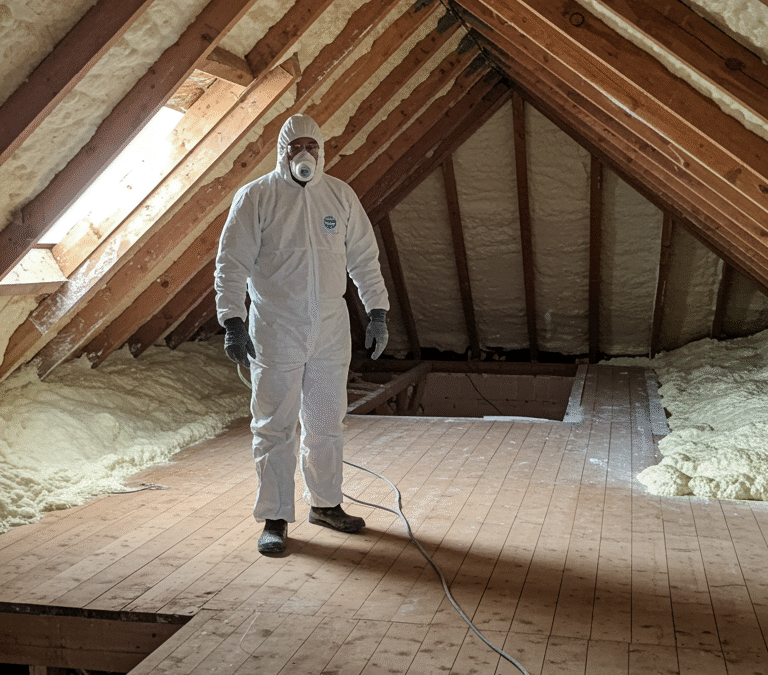
Spray foam insulation can be a fantastic addition to a building with the right use case and customer. Unfortunately, as with any industry, there are cowboys. In the case of spray foam insulation, there are companies pushing incorrectly applied spray foam to market, and homeowners without sufficient knowledge of the problems involved are using them. This can cause serious problems down the line, including condensation, mildew, and rotting. When the spray foam deserves to come off, what follows is an exhausting, expensive, time-consuming job that can be a little strange and a lot eye-rolling. This case study documents the story of a bad spray foam removal job in their attic. This home was an average family home located in Southern England. The customer had been sold incorrectly applied spray foam by individuals who did not care about the quality of their work. This resulted in a series of problems for the customer, including rot and bubbling insulation. The homeowners were understandably tired of living in a mess while dozens of contractors rotated on and off the job site, baffled by the poorly done spray foam. After finally managing to procure an expert to take over the job, the company attempted to get the job done. And failed again and again. Despite the odds seemingly stacked against them, the company finally made it through the job. This left behind a wonderfully intact home for the owners, free of the headache that is bad spray foam.
Initial Assessment
Following the initial inspection, we wanted to assess why the Spray Foam had failed, whether it had caused any damage or damp problems, and whether the damage was significant enough to warrant replacing the external insulation. Given that we were on-site conducting a survey, taking infrared images wasn’t going to provide much useful information. The situation on each side of the cavity was likely to be similar. We already knew that on the internal side, the problem was waxy Spray Foam over insulation – we didn’t need infrared images to tell us that! What we needed to know was the situation within the cavity; whether insulation was present; if any insulation was moisture-damaged, and if any part of the cavity was bridged by moisture; the adhesive on the internal side of the outer leaf, and its position; and most importantly, the condition of the external surface of the inner leaf – we needed to know that it was dry. We needed answers to these questions, primarily to understand if there were any moisture problems likely to affect the removal process and the refinish that followed.
Our discussions with the Building Owner identified three other conditions that were of interest to us: Firstly, the access to the cavity butting against the party wall. Given the layout of the building, the framing could not be removed along the lengths of party walls. How was this area to be assessed, given that it was both inaccessible and invisible? Secondly, given that we were dealing with Spray Foam internal insulation, how was any refinish to be carried out? The party wall butt would lie behind the party wall. Lastly, internal mould growth had been noted at the internal cill. What did the cavity look like at the base of the external leaf? Given that the building was four storeys high, the base was at an inconvenient height.
Client Expectations
At The Foam Removal Company, we do not put together removal proposals to be evasive or to confuse; in fact, the opposite is the goal. Every removal process is unique, and therefore, every removal process requires its own preparatory works, methodology, and proposal. We aim to be as clear as possible in our proposals. We understand that these proposals can be the light at the end of the tunnel for the building owner when things may feel overwhelming, or potentially the final straw in a long and lengthy process of an already-diminished building project. These proposals should ensure understanding of the work, time, costs, and difficulties, so that the project decision-makers and stakeholders can plan for and understand a decision. The goal is to ensure that the owner fully understands what the service includes, and therefore do not end up disappointed should anything not go precisely as expected, as we have been privy to in the past.
For our clients, the amount of resources become lower when there are more realistic expectations of the end result, and generally there’s a greater sense of satisfaction with the project outcome. For safety, and to leave no stone unturned, we treat such proposals and the discussion about them as a zero-bullshit zone; honest, upfront, and unembellished visual assessments with accurate documented works ensure the required understanding. In our experience, the more time that can be invested into the most nitty-gritty details at this stage, the lesser likelihood that there will be surprises and subsequent disappointments. Disappointment is often due to someone’s expectations being higher than is realistically possible based on the details that we have all seen, and as we know, it is better to be pleasantly surprised than overly disappointed, especially within the world of such a high-budget undertaking as a large-scale refurbishment.
The Removal Process
The removal of spray foam is a lengthy and labor-intensive process that consumes more resources than the original application and causes more disruption to the property owners and their neighbours. The steps in the removal process include:
Preparation Steps Before commencing removal, the working area must be prepared. All furniture and decorations are removed from the rooms affected by the installation foam. A protective cover is placed over all resilient materials and glass including the floor coverings, skirtings, windows, window frames and apertures, doors. This covering is often of thick polythene. The cover is taped to the surround and opened at the edges to allow ingress and egress from the location and taped shut when not in use. If the work persists over more than one day then a special user friendly adhesive is used to allow repeated access. Covering is also placed over parts of the building’s exterior. If necessary, edge walls that need to be removed are enclosed in polythene if no covering is used. Side covers are used to minimize overspray. The cover acts as a trap for flying particles during removal and protects resilientised materials.
Step-by-Step Removal Typical equipment used for removal includes electric and pneumatic chisels, especially the Rotohammer with appropriate bits to deal with the different densities and increased serviceability due to non-functioning blades in the chisels. Angle grinders with a flap wheel, and hand tools including chisels and knives with curved and straight blades for different sections, are among the tools for the areas that cannot be accessed by larger equipment. The use of cartridge heaters, heat guns, and infrared heaters additionally soften the material sufficient to allow removal. In some cases, access is provided by burning. Depending on the curing system, certain chemicals including acetone and dimethylsulfoxide have also been used. Removal requires the removal of the outer surfaces of the substrate and the hardened foam. Lightly resilient foams easier to remove than resilient foams.
Preparation Steps
Laying the Tape Before we even think about removing the foam we need to seal off any likely areas of contamination. This is normally just around the periphery of work area, but in some cases can also include service ducting; we once isolated an entire fish-processing plant floor area by custom-made ducting masks/tape. It only takes a moment to tape up the edges but is going to save time at the other end, minimizes the risk of air contamination and signifies to anyone walking in off the street that there is live work happening. The first consideration is which surface to tape; most of the time it will be off of the walls/partitions or risers on to the floor. However, if the foam is spewed all over a polished marble or wood floor we will definitely need to tape the wall/partition edges on to the wall. Most times we will be working with any number of chemicals, all of which have the potential to stain the floor; for furniture, if it is there at all it will either be coated in foam or will have foam all over it from the spray process. That said, we will try to save the customer from a major cleanup/extraction undertaking just to make our life easier.
Step-by-Step Removal
The work proceeds hour by hour, day by day, week by week, and can be summarized as follows:
1. Each day, the team arrives at the property shortly after the client leaves for work. First, the removal person preps the main area of the home by sealing everything that cannot be removed from view, and manhandling the rest into the cupboard and the kitchen sink.
2. Then, the removal person pours the method into a couple of heating pans and places them in the area to be treated. Care is taken to spread it around evenly. A heating fan is also placed strategically, and medical sacrifices made, to ensure an even surface temperature.
3. Next, two body people get into treatment suits, hoody, and eye (and if necessary face) protection, and start chipping away the first layer of adhesive, foam, and plaster. To speed things up, they have at the ready a combi unit with 1.5 to 1.0 mm diameter serrated blades, and electric heat blade heaters that ensure right through repeated uses and long holding times, that the cutters stay hot.
4. They chip their way into the perimeter edge, and then inspect the adhesion of foam to wall panels for a ways down. If the risk of foam pulling the board off with it is small, they switch to a less precise method where the foam is part chiseled, part hurled into the skip on the driveway by an axe.
5. At this point, the job is at an interim state: sweaty operatives in big white suits with lumps and gaps in the walls, and ribs of foam are treated to ear-splitting fans, and the glaze that signifies that one piece at least has been made foam-tight is applied.
Post-Removal Cleanup
Once the Spray Foam Insulation is removed, the actual fun starts: a deep clean of the structure. Not because it has to be done, but because of how it looks and how it feels when this disgusting foam is taken out. It is a huge relief for the industry and the client as well.
The inside of the unit is then cleaned from the debris, as well as with solvents and scrubbing pads from the sticky residues. Usually the team who is cleaning is the same who stripped the foam as it is a specific understanding of how a clean service needs to be performed, plus when the same crew is removing and cleaning the whole process flows better and is done way quicker. Dust and foam particles may remain inside ducts but they are usually able to blow it out through the register so we do not need to worry about them.
On the outside of the building, the excessive foam around the access hatches is removed, as well as the residues left in the bottom of the gutters. Some additional sections of the roof may also be cleaned if they have been sprayed – that is done with the use of a pressure washer, solvents and scrubbing pads. Any scratches made during the job will be patched with roof repair products, usually in a contrasting color. In the end, the job looks way better than before, not because we painted new colors, but because we turned back to life an old roof.
Conclusion
A Contractor’s Perspective and Key Themes
It is not difficult to get excited about discovering awesome new technology. There are so many inventive ideas out there. But most ideas are not inventions and combine both good and bad ideas that may or may not work in the increasingly complex world we live in. Spray foam technology could have been easily dismissed when it was first introduced, but a series of breakthroughs meant that the contractors marketing it had a better use of advertising than the aim might have thought. Since that breakthrough and its growing and almost ubiquitous use, it is now starting to cause problems that need solutions, some ingenious, some overly simple, and some that are just hiding the problem and not looking for an answer.
This paper has provided a contractor’s perspective of the unintended consequences of removing poorly applied spray foam insulation. The decision to provide that perspective stemmed from the opinions of other contractors that undertake high quality spray foam insulation work, that the foam we were being called to remove was of very poor workmanship. What they considered routine when installing difficult foam was either incompetent or negligent, and therefore the contractor who had foamed the building was stuck with. With no legal affect to help the homeowner, the financial, physical, and emotional costs were left to the homeowner and the contractor. Small articles discussed cases but without the emotions and effects of the experiment. The actual contractors involved with the foam removal had no outlet to freely share feelings of being overwhelmed with stressful experiences and to warn others of the potential damage to their business and mental health.